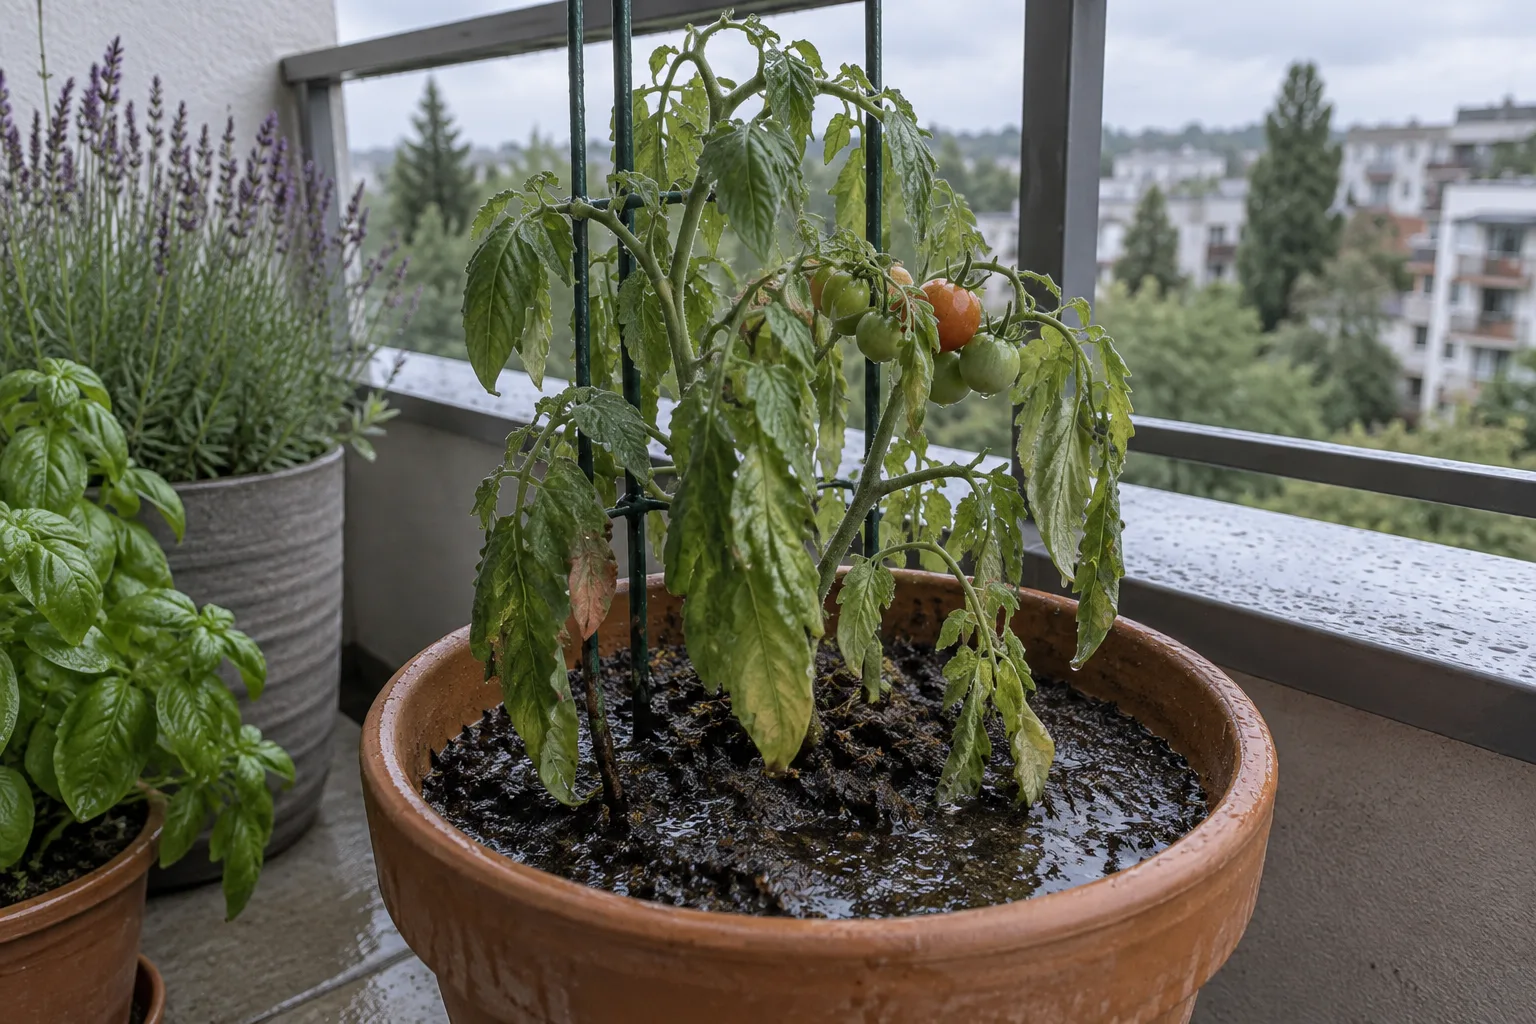
A balcony tomato can look completely fine on Monday and be wilted and gray-leafed by Friday, even though the soil is still wet and you haven’t missed a watering. That’s usually root rot, and it’s one of the few balcony plant problems that does real damage before you see it happening, because everything wrong is happening underground while the top of the plant is still coasting on stored energy.
Here’s how to catch it early, what to do once you find it, and how to tell the difference between a plant that’s worth saving and one that isn’t.
What root rot actually is
Root rot isn’t one single problem; it’s what happens when fungal pathogens, most commonly Pythium, Phytophthora, or Rhizoctonia, take hold in soil that’s staying wet for too long. These organisms are present in most potting mixes at low levels already. They only become a problem once the roots sit in waterlogged, oxygen-starved soil long enough for the fungus to spread faster than the plant can fight it off. Pythium tends to produce mushy, disintegrating roots even when the container looks fine from the outside; Phytophthora often shows up as dark, soft root tips that spread upward into the stem; Rhizoctonia favors warm, humid conditions and can leave a faint thread-like growth right at the soil line.
The practical distinction between the three matters less than recognizing the pattern they share: wet soil for too long, followed by roots that stop functioning, followed by a plant that shows stress on top even though it’s technically getting enough water underneath.
The oxygen mechanism behind why roots die first
The fungal names above explain what eventually finishes a rotted root off, but they’re rarely what starts the process. Water fills the air pockets between soil particles, and saturated soil slows gas diffusion by close to 10,000 times compared to air, so a waterlogged root zone runs out of oxygen within hours to days, not weeks. Root cells need that oxygen for aerobic respiration, which produces roughly 36 units of usable energy per glucose molecule. Cut off from oxygen, the cells switch to anaerobic fermentation instead, which yields only about 2 units of energy from the same glucose and, worse, leaves behind ethanol, acetaldehyde, and lactic acid as byproducts. In a well-drained pot those byproducts never build up; in a waterlogged one they accumulate directly around the roots that produced them.
That buildup is what actually kills root tissue, not drowning in the simple sense. The energy shortfall alone starves the root of what it needs to keep functioning, and the accumulating ethanol and acetaldehyde are toxic to the same cells producing them. By the time Pythium or Phytophthora spores take hold, they’re often colonizing root tissue that’s already dying from oxygen starvation rather than causing the initial damage themselves, which is part of why root rot can advance so fast once it’s visible: the fungal infection and the underlying hypoxia are compounding each other, not happening in sequence. This is the same oxygen-starvation risk covered from the watering-system side in our guide to whether self-watering planters actually work, where a properly functioning reservoir and overflow exist specifically to keep this from happening.
Why it shows up so often in balcony containers
Containers are more prone to root rot than in-ground beds for a few boring but important reasons. Pots dry from the surface down and the edges in, so the center of the root ball can stay saturated long after the top inch looks dry. Saucers left under a pot after rain or watering turn into a standing reservoir the roots sit in around the clock. Garden soil or cheap, dense potting mix compacts in a container and drains far slower than a proper container mix. And balcony pots, especially dark-colored ones, hold heat, which speeds up fungal growth once conditions are already wet.
None of that means containers are inherently risky. It means the margin for overwatering is smaller in a pot than it is in the ground, and root rot is almost always the downstream result of that smaller margin getting crossed repeatedly.
Early signs, before you ever pull the plant out of its pot
- Wilting or drooping leaves even though the soil is visibly wet, since damaged roots can’t take up water regardless of how much is available
- Yellowing that starts on the lower, older leaves and moves upward over a week or two
- Slowed or stalled growth compared to how the plant was performing a few weeks earlier
- A sour, musty, or swampy smell coming from the soil, which healthy potting mix doesn’t have
- Soil that stays dark and heavy days after your last watering, instead of lightening as it should
Any one of these on its own could mean something else; two or three together, especially the smell plus the wilting-while-wet combination, are a strong enough signal to check the roots directly rather than wait and see.
How to check the roots
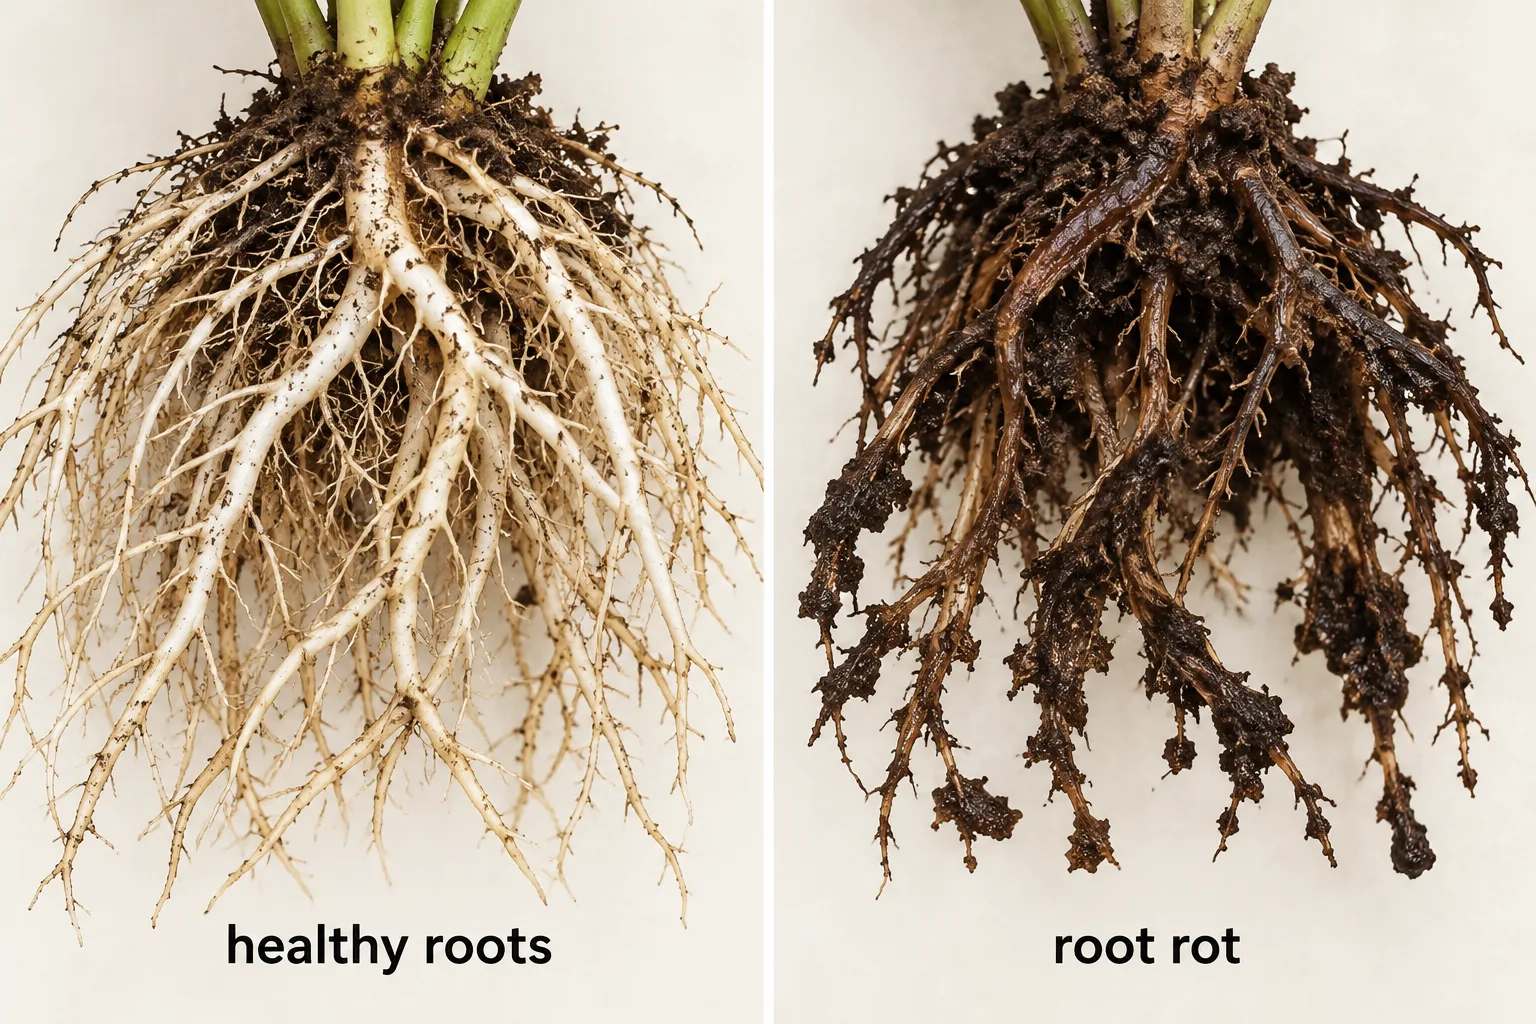
Tip the pot on its side, work your fingers around the inside edge to loosen the root ball, and slide the whole thing out in one piece if you can. Healthy roots are firm to the touch and typically white, tan, or light brown depending on the species; they hold together as a structure and don’t fall apart when you handle them. Rotted roots are dark brown to black, soft or mushy, and often slip off in your fingers, sometimes leaving just a thin fibrous core behind, which is the classic Pythium symptom. A healthy root system usually smells like soil; a rotted one usually doesn’t.
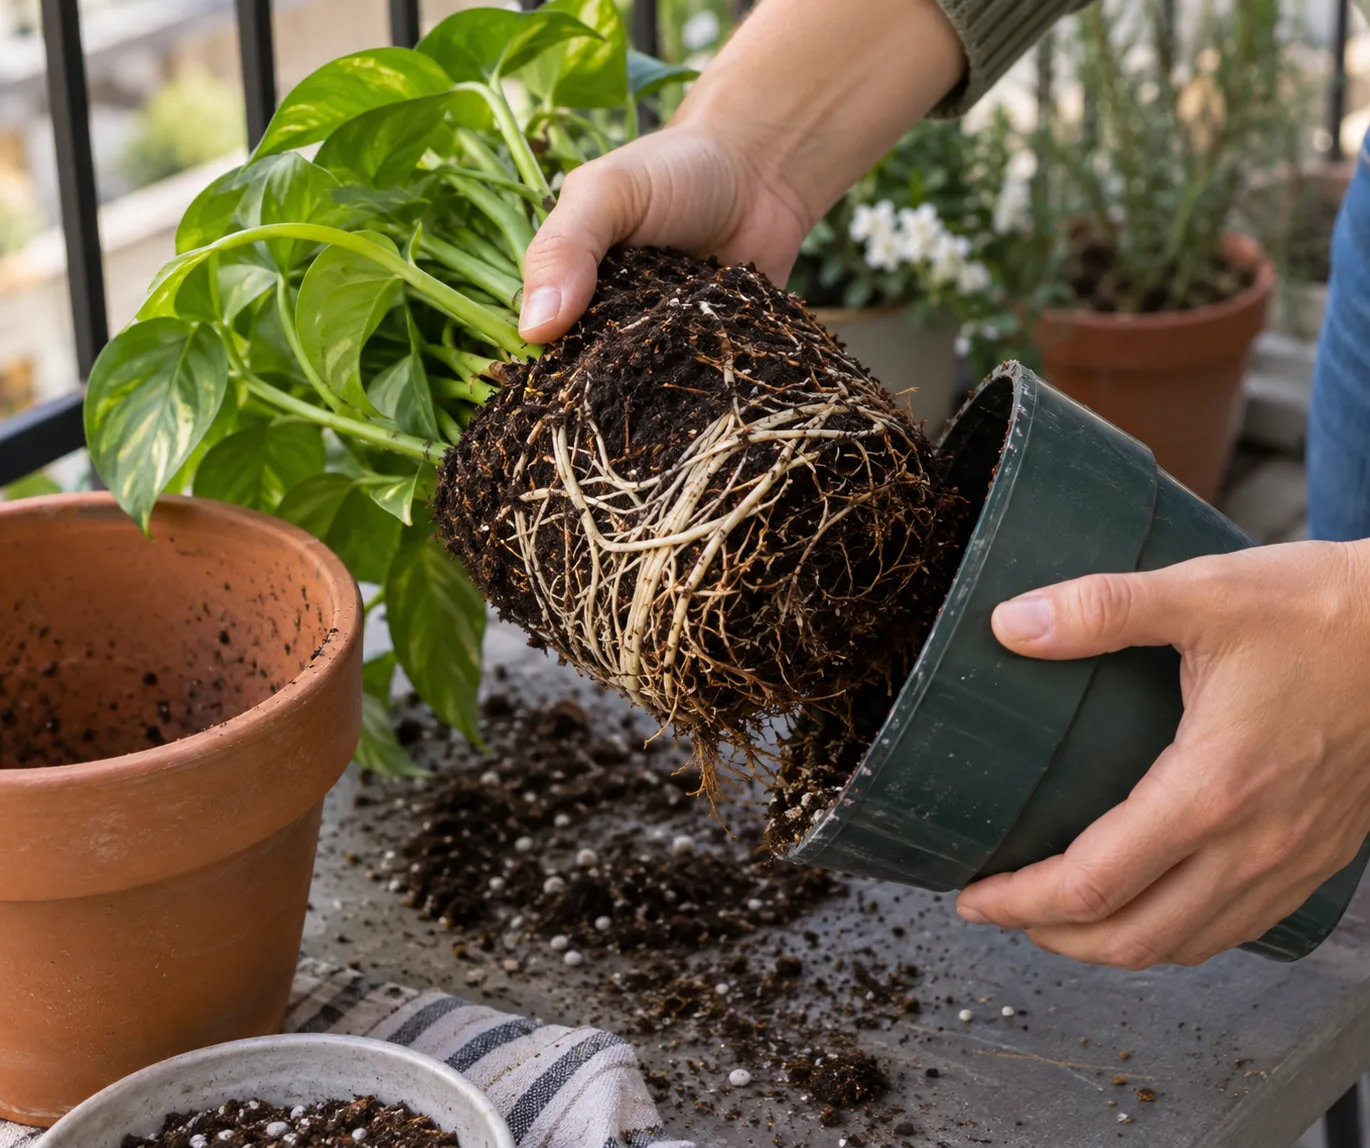
Work from the outside of the root ball inward. It’s common to find the outer roots mostly rotted while the core is still salvageable, which is exactly the situation where trimming and repotting saves the plant instead of losing it.
Fixing it once you’ve found it
Rinse the loose soil off the roots under lukewarm running water so you can see what you’re working with. Using clean scissors or pruning shears, cut away every root that’s dark, soft, or mushy, going back to healthy tissue even if that means removing a significant portion of the root system. Rotted roots left in place will keep spreading the problem into whatever fresh soil you put the plant back into.
Repot into a clean or newly sterilized container, never the same pot without washing it out first, using a fresh, well-draining potting mix rather than garden soil or reused mix from the old pot. To actually sterilize the old pot rather than just rinse it, University of Minnesota Extension recommends a bleach solution diluted about 1 part bleach to 9 parts water, a 10 to 15 minute soak, then a thorough rinse before reuse; skipping this step and just hosing out visible soil leaves fungal spores on the container walls to reinfect whatever goes in next. If the original container didn’t have drainage holes, this is the moment to switch to one that does; a pot without drainage is close to a guaranteed repeat of the same problem down the line. Water lightly after repotting, then hold off until the top inch or two of soil is dry before watering again, giving the trimmed root system a chance to recover without immediately sitting in wet soil again.
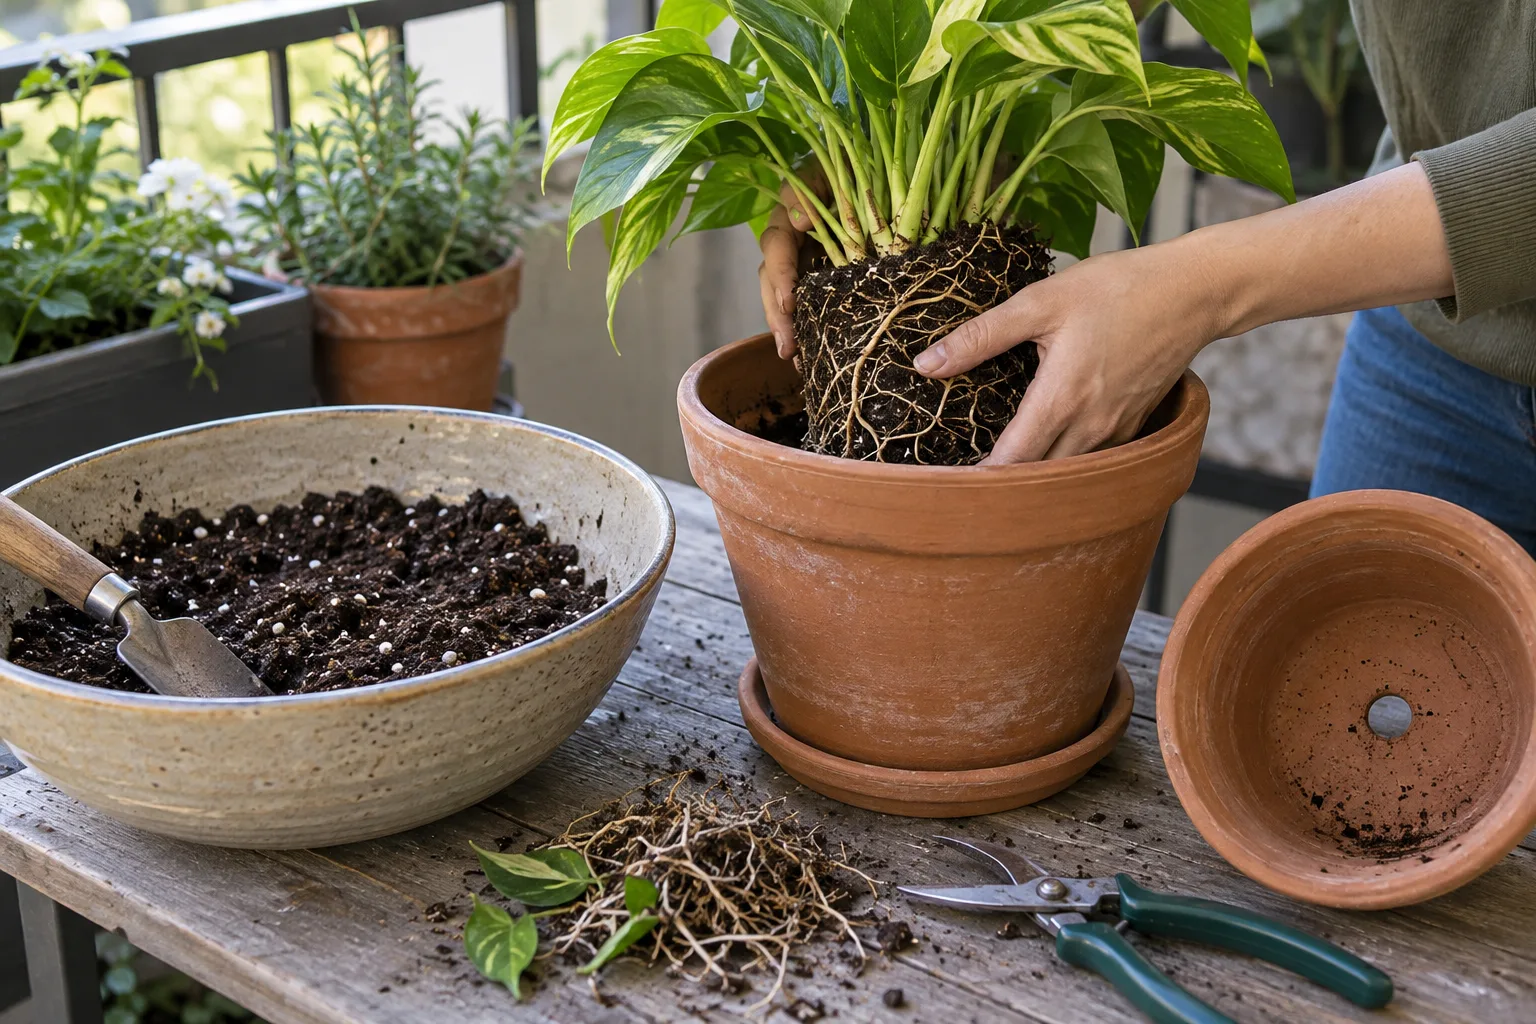
Expect a rough couple of weeks. A plant that’s just lost part of its root system usually looks worse before it looks better, since it has less capacity to support its existing leaves. Some yellowing or leaf drop right after the repot is normal and doesn’t necessarily mean the fix failed.
Do hydrogen peroxide or cinnamon treatments actually help?
Hydrogen peroxide shows up constantly in home root-rot advice, and there’s real research behind part of the claim: a controlled study found 2 percent hydrogen peroxide completely inhibited growth of Rhizoctonia solani, Pythium, and Fusarium in lab conditions, and a peer-reviewed field and greenhouse trial on faba bean found that hydrogen peroxide treatment reduced damping-off and root rot severity and improved plant survival compared with untreated controls. The mechanism fits what’s covered above, too: hydrogen peroxide breaks down into water and oxygen, so a drench can both attack fungal cell structures directly and temporarily relieve some of the oxygen deprivation driving the underlying damage.
Where the evidence gets thinner is the exact use most people are searching for: pouring diluted hydrogen peroxide on an already-rotted houseplant’s roots. That specific application is common enough as folk advice that researchers at Kansas State University launched a dedicated study just to establish whether it’s even safe on orchid roots, precisely because no prior research had settled the question. Treat it as a plausible, evidence-supported idea rather than a proven fix for a plant already in trouble, worth trying at a mild dilution alongside the trim-and-repot process above, not as a substitute for it. Cinnamon, by contrast, has only weak antifungal activity shown in lab dishes and no real field evidence it does anything meaningful once sprinkled on soil or a cut root; it’s a much weaker claim than the hydrogen peroxide research supports.
When it’s too far gone
If more than half the root system is dark and mushy, if the rot has already traveled up into the base of the stem, or if the stem itself has gone soft and discolored near the soil line, the odds of a full recovery drop sharply. It’s still worth trying on a plant you’re attached to, but it’s fair to treat a badly rotted plant as a loss and start over with a fresh one rather than spending weeks nursing something that’s unlikely to make it. That’s a judgment call, not a hard rule, and a lot depends on how much of the plant is still visibly healthy above the soil line.
Some balcony plants are far more prone to it than others
Herbs like rosemary, lavender, and thyme, along with most succulents, evolved in dry, fast-draining soil and have almost no tolerance for sitting wet; a single week of daily watering on a rosemary plant is often enough to start the process. Leafy vegetables, tomatoes, and most flowering annuals have a wider margin and can handle an occasional soggy stretch without much consequence. If you’re growing a mix of both in similar-looking pots on the same balcony, it’s worth remembering that a watering routine calibrated for the tomatoes is likely overwatering the rosemary sitting next to them, even though both plants look fine on the surface for a while.
Self-watering planters need a different kind of attention
Self-watering containers pull moisture up from a reservoir as the plant needs it, which solves inconsistent watering but introduces a different risk: if the reservoir never fully drains or dries between refills, the soil directly above the wicking material can stay saturated indefinitely, right where the bulk of the root system lives. That’s a slower, quieter path to the same problem described above. Our guide to self-watering planters versus traditional pots covers how to size the reservoir and mix correctly so the system doesn’t work against itself.
A complication that likes the same conditions: fungus gnats
If small, mosquito-like insects have been hovering around a plant that’s also showing the symptoms above, that’s not a coincidence. Cornell Cooperative Extension notes that overwatering is the leading factor in attracting fungus gnats, since chronically damp soil is exactly what their eggs and larvae need to thrive; the same wet conditions that let root-rot fungi take hold are also what draws gnats in and lets their larvae establish. The larvae themselves feed on fine root hairs and organic matter in the top layer of soil, which doesn’t cause root rot on its own but does add a second, separate source of root stress on top of whatever the fungal pathogens are already doing, on the same plant, from the same underlying cause.
Cornell’s recommended treatment for the larvae specifically is a hydrogen peroxide drench: one part 3 percent hydrogen peroxide mixed with four parts water, poured over the soil, then letting the soil dry out afterward so gnats don’t simply come right back to the same damp conditions. It’s worth being precise about what this treats and what it doesn’t: it’s a fix for the gnat larvae in the top layer of soil, not a treatment for the Pythium, Phytophthora, or Rhizoctonia already established in the root system, so it’s a useful addition alongside the trim-and-repot process above, not a substitute for it. Letting the soil dry properly afterward does double duty here too, since drying out the surface is also part of what breaks the cycle for both problems at once.
Keeping it from happening again
- Every container needs real drainage holes; a pretty pot with none isn’t worth the risk
- Empty saucers after rain or watering instead of letting water sit in them
- Use a proper container or potting mix, not garden soil, which compacts and drains poorly in a pot
- Check soil moisture at root depth before watering rather than watering on a fixed schedule
- Space plants so air can move around the base, since dense, still air keeps soil surfaces wetter for longer
Most of this overlaps directly with getting watering right in the first place, covered in more detail in our guide to telling overwatering and underwatering apart. If root rot turns out not to be what’s going on with a struggling plant, the full troubleshooting checklist walks through the other usual suspects in order, and our guide to repotting a balcony plant covers the mechanics of the move itself beyond just the root trim.
Sources
- University of Maryland Extension: Root Rots of Indoor Plants
- Cornell Cooperative Extension: Fungus Gnats
- Frontiers in Plant Science: Mechanisms of Waterlogging Tolerance in Plants
- Improvement of Biocontrol of Damping-off and Root Rot/Wilt of Faba Bean by Salicylic Acid and Hydrogen Peroxide (PMC)
- University of Minnesota Extension: Clean and Disinfect Gardening Tools and Containers